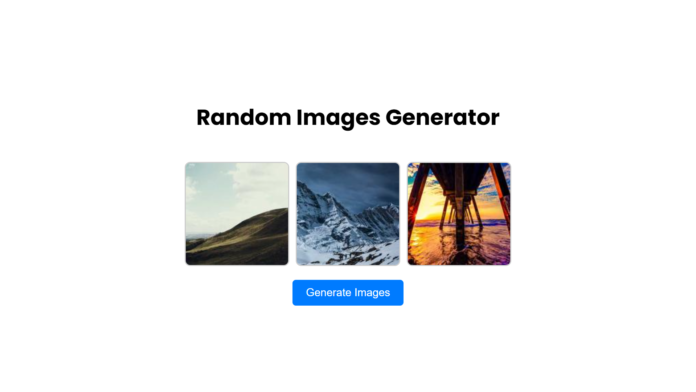
Creating fun and interactive web applications is a great way to learn and showcase your web development skills. In this blog post, we’ll build a Random Images Generator using HTML, CSS, and JavaScript. This simple project will display random images every time a button is clicked, making use of the Picsum API to fetch beautiful placeholder images.
What You’ll Learn
By the end of this tutorial, you will:
- Understand how to structure a web page with HTML.
- Style it beautifully using CSS.
- Add interactivity with JavaScript.
Video Tutorial:
The Project Overview
Here’s what the Random Images Generator will do:
- Display three random images on the screen.
- Fetch new images each time the user clicks a button.
Step-by-Step Guide
1. HTML: The Structure
We start by creating the basic structure of the page. The HTML file includes:
- A heading to describe the page.
- A container (
div) to hold the images. - A button to generate new images.
Here’s the code for the HTML
<!DOCTYPE html>
<html lang="en">
  <head>
    <meta charset="UTF-8" />
    <meta name="viewport" content="width=device-width, initial-scale=1.0" />
    <title>Generate Random Images</title>
    <link rel="stylesheet" href="style.css" />
  </head>
  <body>
    <h1>Random Images Generator</h1>
    <div class="images" id="images"></div>
    <button id="generate-btn">Generate Images</button>
    <script src="script.js"></script>
  </body>
</html>
2. CSS: The Styling
Next, we add styling to make our page visually appealing. We use a clean layout with the Poppins font, flexbox for alignment, and a modern button design.
Here’s the CSS:
body {
  font-family: "Poppins", sans-serif;
  display: flex;
  flex-direction: column;
  align-items: center;
  justify-content: center;
  min-height: 100vh;
  margin: 0;
}
.images {
  display: flex;
  gap: 10px;
  margin: 20px 0;
}
img {
  width: 150px;
  height: 150px;
  object-fit: cover;
  border: 2px solid #cccccc;
  border-radius: 8px;
}
button {
  padding: 10px 20px;
  font-size: 16px;
  cursor: pointer;
  border: none;
  background-color: #007bff;
  color: #ffffff;
  border-radius: 5px;
}
button:hover {
  background-color: #0056b3;
}
3. JavaScript: The Interactivity
The JavaScript code fetches random images and updates the page whenever the button is clicked.
Here’s the JavaScript:
function getRandomImageUrl() {
  const width = 150;
  const height = 150;
  return `https://picsum.photos/${width}/${height}?random=${Math.random()}`;
}

function generateImages() {
  const imagesContainer = document.getElementById("images");
  imagesContainer.innerHTML = "";
  for (let i = 0; i < 3; i++) {
    const img = document.createElement("img");
    img.src = getRandomImageUrl();
    imagesContainer.appendChild(img);
  }
}

document
  .getElementById("generate-btn")
  .addEventListener("click", generateImages);

// Generate initial set of images on page load
generateImages();


