Introduction:
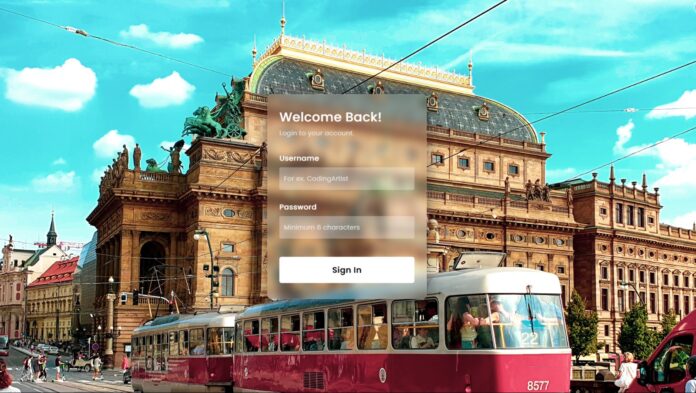
Glassmorphism has taken the world of web design by storm, offering a clean, frosted-glass aesthetic that adds depth and a modern touch to websites. In this tutorial, you will learn how to create a beautiful transparent login form using HTML and CSS from scratch. This design trend enhances user experience with sleek, minimalistic forms that blend seamlessly with your website’s background. Whether you’re a beginner or looking to enhance your CSS skills, this project will walk you through the entire process, from setting up the project structure to adding the final styling details.
Things You Will Learn:
In this tutorial, you’ll learn:
- How to set up a basic project structure for HTML and CSS.
- How to create a fully responsive form using modern CSS.
- How to apply the Glassmorphism effect using backdrop filters.
- How to make forms stand out with custom fonts and subtle shadows.
Video Tutorial:
If you are interested to learn by watching a video tutorial rather reading a blog post you can check out the video down below. Also subscribe to my YouTube channel where I post new tutorials every alternate day.
Project Folder Structure:
Let us explore the project folder structure. The project folder consists of 2 files. The HTML file creates the elements required to build the structure and layout of our project. Next, the CSS file styles the elements that we have created with CSS. The files used are:
- index.html
- style.css
HTML:
We begin with the HTML code. Copy the code below and paste it into your HTML document.
<!DOCTYPE html>
<html lang="en">
  <head>
    <meta name="viewport" content="width=device-width, initial-scale=1.0" />
    <title>Transparent Form</title>
    <link rel="stylesheet" href="style.css" />
  </head>
  <body>
    <form>
      <h3>
        Welcome Back!
        <span>Login to your account</span>
      </h3>

      <label for="username">Username</label>
      <input type="text" placeholder="For ex. Coding Artist" id="username" />

      <label for="password">Password</label>
      <input type="password" placeholder="Minimum 6 characters" id="password" />

      <button>Sign In</button>
    </form>
  </body>
</html>
CSS:
Next, we style our form using CSS. For this copy, the code provided to you below and paste it into your stylesheet.
*,
*:before,
*:after {
  padding: 0;
  margin: 0;
  box-sizing: border-box;
  outline: none;
  -webkit-tab-highlight-color: transparent !important;
}
body {
  background: url("background.jpg");
  height: 100vh;
  width: 100vh;
  background-size: cover;
}
form {
  height: 450px;
  width: 350px;
  background-color: rgba(255, 255, 255, 0.07);
  box-shadow: 50px 100px rgba(0.2);
  position: absolute;
  top: 50%;
  left: 50%;
  transform: translate(-50%, -50%);
  backdrop-filter: blur(10px);
  border: 2px solid rgba(255, 255, 255, 0.1);
  box-shadow: 0 0 50px rgba(8, 7, 16, 1);
  padding: 30px 25px;
}
form * {
  font-family: "Poppins", sans-serif;
  color: #ffffff;
  letter-spacing: 0.5px;
  outline: none;
  border: none;
}
form h3 {
  font-size: 28px;
  font-weight: 500;
  line-height: 36px;
}
form h3 span {
  display: block;
  font-size: 14px;
  font-weight: 300;
  color: #e5e5e5;
}
label {
  display: block;
  margin-top: 25px;
  font-size: 16px;
  font-weight: 500;
}
input {
  display: block;
  height: 50px;
  width: 100%;
  background-color: rgba(255, 255, 255, 0.3);
  border-radius: 3px;
  padding: 0 10px;
  margin-top: 8px;
  font-size: 14px;
  font-weight: 300;
}
::placeholder {
  color: #e5e5e5;
}
button {
  margin: 40px;
  width: 250px;
  background-color: #ffffff;
  color: #080710;
  padding: 15px 0;
  font-size: 18px;
  font-weight: 600;
  border-radius: 5px;
  cursor: pointer;
}
Conclusion:
By following this tutorial, you’ve successfully created a stunning transparent form that stands out with its modern, clean design. This form not only enhances user experience but also elevates the visual aesthetics of any webpage.
For more detailed guidance, don’t forget to watch the full video on my YouTube channel. Happy coding!


