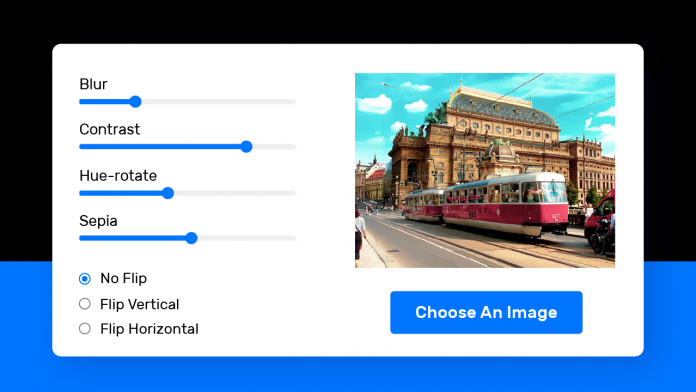
Hello and welcome to today’s tutorial. Today we will create a basic Image editor using HTML, CSS and Javascript. This project is suitable for javascript intermediates. Beginners can try this too but, this might be somewhat tricky.
In this image editor, we can upload any image of our choice. Next, we can choose from four different filters – Blur, contrast,hue-rotate and sepia. Further, we can control the intensity of each of these filters. We also have options to flip the image along the X-axis or the Y-axis. Let us get started with this tutorial.
Video Tutorial:
If you are interested in watching the video version of this tutorial, please check the video below. Also, check out my youtube channel where I post a coding video every alternate day.
Folder Structure:
Let’s check out the project folder structure before we move on to the actual tutorial. The project folder is called Basic Image Editor. Inside these, there are three files. Firstly, An HTML document called index.html. Next is the stylesheet with the name style.css and Lastly, we have the javascript file called script.js.
HTML:
The HTML section consists of a wrapper div. within this wrapper, there are two main div elements. First is the editor part. The editor consists of a four range slider with some min and max values. We also have three flip buttons div inside this. The flip button div consists of three radio buttons that are used to choose between – No flip, Flip-X and Flip-Y.
The result div consists of the output image. It also consists of a file upload button.
<!DOCTYPE html>
<html lang="en">
<head>
    <meta name="viewport" content="width=device-width, initial-scale=1.0">
    <title>Image Editor</title>
    <!-- Google Fonts -->
    <link href="https://fonts.googleapis.com/css2?family=Rubik:wght@400;600&display=swap" rel="stylesheet">
    <!-- Stylesheet -->
    <link rel="stylesheet" href="style.css">
</head>
<body>
    <div class="wrapper">
        <div class="editor">
            <div class="filter">
                <label for="blur">Blur</label>
                <input type="range" min="0" max="5" value="0" step="0.1" id="blur">
            </div>
            <div class="filter">
                <label for="contrast">Contrast</label>
                <input type="range" min="0" max="200" value="100" id="contrast">
            </div>
            <div class="filter">
                <label for="hue-rotate">Hue-Rotate</label>
                <input type="range" min="0" max="360" value="0" id="hue-rotate">
            </div>
            <div class="filter">
                <label for="sepia">Sepia</label>
                <input type="range" min="0" max="100" value="0" id="sepia">
            </div>
            <div class="flip-buttons">
                <div class="flip-option">
                    <input type="radio" name="flip" id="no-flip" checked>
                    <label for="no-flip">No Flip</label>
                </div>
                <div class="flip-option">
                    <input type="radio" name="flip" id="flip-x">
                    <label for="flip-x">Flip Horizontal</label>
                </div>
                <div class="flip-option">
                    <input type="radio" name="flip" id="flip-y">
                    <label for="flip-y">Flip Vertical</label>
                </div>
            </div>
        </div>
        <div class="result">
            <figure class="image-container">
                <img id="chosen-image">
            </figure>
            <input type="file" id="upload-button" accept="Image/*">
            <label for="upload-button">Choose An Image</label>
        </div>
    </div>

    <!-- Script -->
    <script src="script.js"></script>
</body>
</html>
CSS:
Now coming to the CSS section. Copy the code provided below into your stylesheet.
In CSS, we mainly customize the range sliders and the flip upload button. If you need more help, I have a tutorial on styling range sliders here and styling a file upload button with a preview here. We set a media query breakpoint at 620px. So below 620px, the divs collapse into one single column.
*{
    padding: 0;
    margin: 0;
    box-sizing: border-box;
    font-family: "Rubik",sans-serif;
}
body{
    background-color: #d3e8f5;
}
.wrapper{
    width: 85vw;
    min-height: 50vmin;
    padding: 50px 30px;
    background-color: #ffffff;
    position: absolute;
    transform: translate(-50%,-50%);
    top: 50%;
    left: 50%;
    border-radius: 10px;
    box-shadow: 0 20px 35px rgba(0,0,0,0.15);
    display: grid;
    grid-template-columns: 5fr 7fr;
}
.editor{
    min-height: 35vmin;
    display: flex;
    flex-direction: column;
    justify-content: space-around;
    gap: 20px;
}
.editor label{
    font-size: 2.8vmin;
    color: #2a292a;
    font-weight: 400;
}
.editor input[type="range"]{
    display: block;
    width: 100%;
    position: relative;
    margin-top: 5px;
}
.flip-buttons{
    display: flex;
    flex-direction: column;
    margin-top: 10px;
}
.flip-buttons .flip-option{
    margin-top: 10px;
}
.result{
    position: relative;
    display: flex;
    flex-direction: column;
    justify-content: center;
    gap: 20px;
}
.result img{
    display: block;
    position: relative;
    max-width: calc(100% - 4vmin);
    max-height: 45vmin;
    margin: auto;
}
.image-container{
    display: none;
}
input[type="file"]{
    display: none;
}
.result label{
    display: block;
    position: relative;
    margin: 0 auto;
    width: 220px;
    background-color: #025bee;
    color: #ffffff;
    text-align: center;
    padding: 16px 0;
    border-radius: 5px;
    font-size: 2.8vmin;
    font-weight: 400;
    cursor: pointer;
}
@media screen and (max-width: 620px) {
    .wrapper{
        width: 95vw;
        grid-template-columns: 1fr;
        padding: 30px 20px;
        gap:  10px;
    }
    .editor{
        grid-row: 2;
    }
    .flip-buttons{
        flex-direction: row;
        justify-content: space-between;
    }
    .flip-buttons .flip-option{
        margin-top: 0;
    }
}
Javascript:
Lastly, we add functionality to this image editor using javascript. Copy the code provided below and paste it into your script file.
Get all the filters, flip radio buttons and assign them to variables. Do a similar thing for the image upload button and the target image.
We set up a function in which we display an image selected by the user in the result div.
On input on any of the sliders, we trigger the addFilter(). The addFilter() function simply adds javascript generated CSS styles to the Image.
We have a reset function that is run every time we upload a new image. The reset() sets all the filters and flip options to their default values.
let filterA = document.getElementById("blur");
let filterB = document.getElementById("contrast");
let filterC = document.getElementById("hue-rotate");
let filterD = document.getElementById("sepia");

let noFlipBtn = document.getElementById("no-flip");
let flipXBtn = document.getElementById("flip-x");
let flipYBtn = document.getElementById("flip-y");

let uploadButton = document.getElementById("upload-button");
let image = document.getElementById("chosen-image");


function resetFilter(){
    filterA.value = "0";
    filterB.value = "100";
    filterC.value = "0";
    filterD.value = "0";
    noFlipBtn.checked = true;
    addFilter();
    flipImage();
}

uploadButton.onchange = () => {
    resetFilter();
    document.querySelector(".image-container").style.display = "block";
    let reader = new FileReader();
    reader.readAsDataURL(uploadButton.files[0]);
    reader.onload = () => {
        image.setAttribute("src", reader.result);
    }
}

let sliders = document.querySelectorAll(".filter input[type='range']");
sliders.forEach( slider => {
    slider.addEventListener("input", addFilter);
});

function addFilter(){
    image.style.filter = `blur(${filterA.value}px) contrast(${filterB.value}%) hue-rotate(${filterC.value}deg) sepia(${filterD.value}%)`;
}

let radioBtns = document.querySelectorAll(".flip-option input[type='radio']");
radioBtns.forEach( radioBtn => {
    radioBtn.addEventListener("click", flipImage);
});

function flipImage(){
    if(flipXBtn.checked){
        image.style.transform = "scaleX(-1)";
    }
    else if(flipYBtn.checked){
        image.style.transform = "scaleY(-1)";
    }
    else{
        image.style.transform = "scale(1,1)";
    }
}
If you have any issues while coding this, you can download the source code by clicking on the ‘Download code’ button below. Comment below if you have any queries or suggestions.


