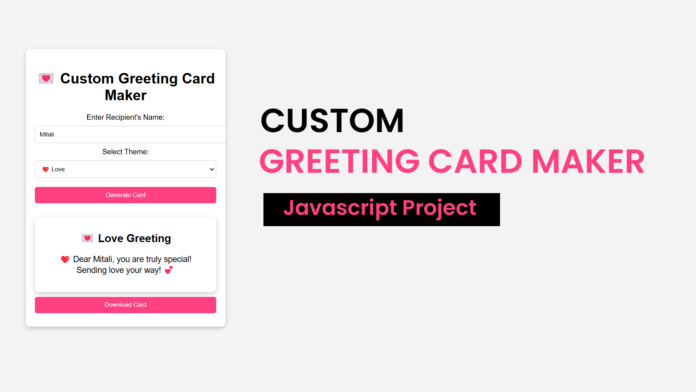
Everyone loves receiving a personalized greeting card! Whether it’s for a birthday, a congratulations message, or just to show appreciation, a custom card makes the moment special.
In this tutorial, we’ll build a Custom Greeting Card Maker using pure HTML, CSS, and JavaScript. Plus, users can download their greeting card as an image with just a click! 🚀
🎯 Features of Our Greeting Card Maker
✅ Custom Message – Users can enter a recipient’s name.
✅ Multiple Themes – Choose from Birthday, Congratulations, Love, and Friendship.
✅ Instant Card Preview – Displays a greeting card dynamically.
✅ Download as Image – Save the card as an image (PNG).
✅ No Libraries Required – Only uses html2canvas for image conversion.
🚀 Code Breakdown
1️⃣ HTML: Setting Up the Greeting Card Form
Our HTML contains:
- A text input to enter the recipient’s name.
- A dropdown menu to select a theme.
- A button to generate the card.
- A hidden greeting card section that appears when a card is created.
- A download button to save the greeting card as an image.
<!DOCTYPE html>
<html lang="en">
  <head>
    <meta charset="UTF-8" />
    <meta name="viewport" content="width=device-width, initial-scale=1.0" />
    <title>Custom Greeting Card Maker</title>
    <link rel="stylesheet" href="style.css" />
  </head>
  <body>
    <div class="container">
      <h1>💌 Custom Greeting Card Maker</h1>

      <label for="name">Enter Recipient's Name:</label>
      <input type="text" id="name" placeholder="Type a name..." required />

      <label for="theme">Select Theme:</label>
      <select id="theme">
        <option value="birthday">🎂 Birthday</option>
        <option value="congratulations">🎉 Congratulations</option>
        <option value="love">❤️ Love</option>
        <option value="friendship">🤗 Friendship</option>
      </select>

      <button id="generateCard">Generate Card</button>

      <div id="card" class="card">
        <h2 id="cardTitle"></h2>
        <p id="cardMessage"></p>
      </div>

      <button id="downloadCard">Download Card</button>
    </div>
    <script src="script.js"></script>
  </body>
</html>
2️⃣ CSS: Making It Look Beautiful
We’ll style the form with a simple and elegant design:
body {
  font-family: Arial, sans-serif;
  text-align: center;
  background-color: #f4f4f4;
  margin: 20px;
}

.container {
  max-width: 400px;
  margin: auto;
  background: white;
  padding: 20px;
  border-radius: 10px;
  box-shadow: 0 4px 10px rgba(0, 0, 0, 0.2);
}

input, select, button {
  width: 100%;
  padding: 10px;
  margin: 10px 0;
  border: 1px solid #ccc;
  border-radius: 5px;
}

button {
  background-color: #ff4081;
  color: white;
  border: none;
  cursor: pointer;
}

button:hover {
  background-color: #d81b60;
}

.card {
  display: none;
  background: #fff;
  padding: 20px;
  border-radius: 10px;
  margin-top: 20px;
  box-shadow: 0 4px 10px rgba(0, 0, 0, 0.2);
}

.card h2 {
  font-size: 24px;
  margin: 10px 0;
}

.card p {
  font-size: 18px;
}
3️⃣ JavaScript: Making the Card Generator Work
Now, let’s generate a greeting card dynamically based on user input!
document.getElementById("generateCard").addEventListener("click", function () {
  let name = document.getElementById("name").value.trim();
  let theme = document.getElementById("theme").value;

  if (name === "") {
    alert("Please enter a name.");
    return;
  }

  let cardTitle = document.getElementById("cardTitle");
  let cardMessage = document.getElementById("cardMessage");
  let card = document.getElementById("card");

  let themeMessages = {
    birthday: `🎂 Happy Birthday, ${name}! 🎉 Wishing you a fantastic day!`,
    congratulations: `🎉 Congratulations, ${name}! 🏆 Keep shining and achieving great things!`,
    love: `❤️ Dear ${name}, you are truly special! Sending love your way! 💕`,
    friendship: `🤗 Hey ${name}! You're an amazing friend! 🌟 Stay awesome!`,
  };

  cardTitle.innerText = `💌 ${
    theme.charAt(0).toUpperCase() + theme.slice(1)
  } Greeting`;
  cardMessage.innerText = themeMessages[theme];

  card.style.display = "block";
});
🛠️ How It Works:
✔️ Uses html2canvas – Converts the greeting card into an image.
✔️ Creates a Download Link – Generates a PNG file and prompts download.
🎯 Final Thoughts
This Custom Greeting Card Maker is a fun and practical project that can be used for:
- Personalized Greetings 💌
- Special Occasions 🎉
- Gifting Digital Cards 🎁
It’s a beginner-friendly JavaScript project that teaches DOM manipulation, event handling, and image generation.
💡 Try it out and make someone’s day special! 🎊


