Video Tutorial:
If you would like to learn by coding to a video tutorial rather than reading this blog post, check out the video here down below. I post new tutorials, tricks and resources on my youtube channel regularly. So subscribe to my channel to get access to all these useful resources.
Project Folder Structure:
Before we go on to code anything we need to create the project folder structure. We create a project folder called – ‘CSS Art’. Inside this folder, we have two files – index.html and style.css. These are the HTML document and the stylesheet respectively.
HTML:
We begin with the HTML code. First copy the code provided below and paste it into your HTML document. This creates the basic layout needed for our art.
<!DOCTYPE html>
<html lang="en">
  <head>
    <meta name="viewport" content="width=device-width, initial-scale=1.0" />
    <title>CSS Art</title>
    <!-- Font Awesome Icons -->
    <link
      rel="stylesheet"
      href="https://cdnjs.cloudflare.com/ajax/libs/font-awesome/6.0.0/css/all.min.css"
    />
    <!-- Google Fonts-->
    <link
      href="https://fonts.googleapis.com/css2?family=Poppins:ital,wght@1,600&display=swap"
      rel="stylesheet"
    />
    <!-- Stylesheet -->
    <link rel="stylesheet" href="style.css" />
  </head>
  <body>
    <div class="container">
      <i class="fa-solid fa-heart"></i>
      <div class="bread">
        <div class="bottom"></div>
        <div class="leg"></div>
      </div>
      <div class="jam">
        <div class="lid"></div>
        <div class="label">
          <div class="strawberry"></div>
          <div class="hand"></div>
        </div>
      </div>
      <h3>I loaf you berry much!</h3>
    </div>
  </body>
</html>
CSS:
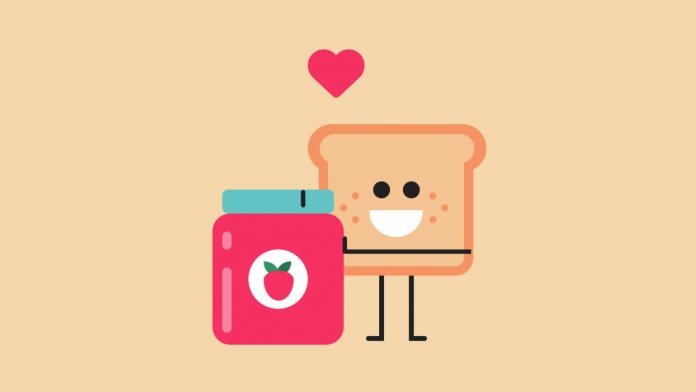
We would be using CSS to shape all the divs into various elements. However, for heart, I have chosen to use an Icon. I am using ‘Font Awesome Icons’ for this purpose. You can find the link to the font awesome CDN in the head section of our HTML.
Next, we shape and position these elements using CSS. For this purpose copy the code below and paste it into your stylesheet.
* {
  padding: 0;
  margin: 0;
  box-sizing: border-box;
}
body {
  background-color: #f5d7ab;
}
.container {
  height: 350px;
  width: 350px;
  position: absolute;
  transform: translate(-50%, -50%);
  left: 50%;
  top: 50%;
}
.bread {
  width: 150px;
  height: 40px;
  background-color: #f59362;
  border-radius: 40px;
  position: absolute;
  top: 80px;
  right: 50px;
}
.bread:before {
  content: "";
  position: absolute;
  width: 130px;
  height: 25px;
  background-color: #f5c493;
  border-radius: 30px;
  left: 10px;
  top: 8px;
}
.bottom {
  background-color: #f5c493;
  width: 130px;
  height: 95px;
  border: 8px solid #f59362;
  position: absolute;
  top: 32px;
  left: 9px;
  border-top: none;
  border-radius: 0 0 15px 15px;
}
.bread:after {
  position: absolute;
  content: "";
  background-color: #202020;
  height: 14px;
  width: 14px;
  border-radius: 50%;
  top: 48px;
  left: 55px;
  box-shadow: 25px 0 #202020;
}
.bottom:before {
  position: absolute;
  content: "";
  height: 22.5px;
  width: 45px;
  background-color: #ffffff;
  margin: auto;
  left: 0;
  right: 0;
  top: 40px;
  border-radius: 0 0 22.5px 22.5px;
}
.bottom:after {
  position: absolute;
  content: "";
  height: 6px;
  width: 6px;
  background-color: #f59362;
  top: 25px;
  left: 20px;
  border-radius: 50%;
  box-shadow: -10px 10px #f59362, 0 20px #f59362, 65px 0 #f59362,
    75px 10px #f59362, 65px 20px #f59362;
}
.leg {
  position: absolute;
  height: 55px;
  width: 4px;
  background-color: #202020;
  top: 127px;
  left: 60px;
  box-shadow: 25px 0 #202020;
}
.leg:before {
  position: absolute;
  content: "";
  height: 4px;
  width: 15px;
  background-color: #202020;
  right: 0;
  bottom: 0;
  border-radius: 5px;
  box-shadow: 36px 0 #202020;
}
.jam {
  background-color: #f53162;
  height: 110px;
  width: 110px;
  position: absolute;
  bottom: 85px;
  left: 70px;
  border-radius: 15px;
}
.jam:before {
  content: "";
  position: absolute;
  height: 55px;
  width: 8px;
  background-color: rgba(255, 255, 255, 0.4);
  border-radius: 5px;
  left: 8px;
  bottom: 10px;
}
.jam:after {
  content: "";
  position: absolute;
  height: 15px;
  width: 8px;
  background-color: rgba(255, 255, 255, 0.4);
  border-radius: 5px;
  left: 8px;
  top: 15px;
}
.lid {
  background-color: #62c4c4;
  height: 20px;
  width: 85%;
  position: absolute;
  left: 7.5%;
  top: -20px;
  border-radius: 5px;
}
.label {
  background-color: #ffffff;
  height: 50px;
  width: 50px;
  border-radius: 50%;
  position: absolute;
  margin: auto;
  left: 0;
  right: 0;
  top: 0;
  bottom: 0;
}
.strawberry {
  position: absolute;
  background-color: #319362;
  height: 13px;
  width: 13px;
  top: 10px;
  left: 13px;
  border-radius: 0 13px;
}
.strawberry:before {
  position: absolute;
  content: "";
  background-color: #27774f;
  height: 13px;
  width: 13px;
  border-radius: 0 13px;
  top: 0;
  left: 10px;
  transform: rotateY(-180deg);
}
.strawberry:after {
  position: absolute;
  content: "";
  height: 25px;
  width: 25px;
  background-color: #f53162;
  border-radius: 50% 50% 50% 50% / 30% 30% 70% 70%;
  top: 8px;
  left: 0;
}
.hand {
  height: 4px;
  width: 107px;
  background-color: #202020;
  position: absolute;
  right: -139px;
}
.hand:after {
  position: absolute;
  content: "";
  background-color: #202020;
  height: 15px;
  width: 4px;
  border-radius: 4px;
  left: -3px;
  bottom: 0;
  box-shadow: -35px -40px #202020;
}
.fa-heart {
  color: #f53162;
  font-size: 20px;
  position: absolute;
  left: 150px;
  top: 160px;
  animation: heartbeat 5s infinite;
}
@keyframes heartbeat {
  60% {
    font-size: 50px;
    transform: translateY(-160px);
  }
  100% {
    font-size: 50px;
    transform: translateY(-160px);
  }
}
h3 {
  width: 100%;
  position: absolute;
  text-align: center;
  bottom: 20px;
  font-family: "Poppins", sans-serif;
  color: #f53162;
  letter-spacing: 4px;
  text-transform: capitalize;
}
Your CSS art is now ready. That’s it for this tutorial. If you have any issues while creating this code you can download the source code by clicking on the download code button below. Also if you have queries, suggestions or feedback do drop them in the comments below.
See you next time with yet another exciting tutorial. Happy Coding!


