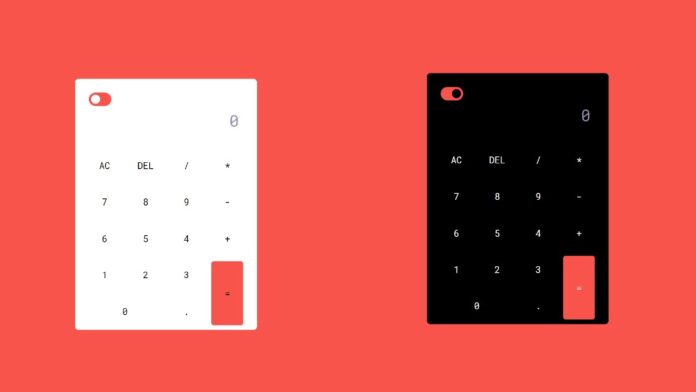
Introduction:
In this tutorial, you will learn how to build a fully functional calculator with a dark mode toggle feature using HTML, CSS, and JavaScript. This project will teach you the basics of JavaScript DOM manipulation, how to evaluate mathematical expressions, and how to implement a simple dark mode switch.
Things You Will Learn:
By the end of this tutorial, you will learn:
- How to capture button inputs and display them on the screen.
- How to evaluate mathematical expressions using
eval()in JavaScript. - How to implement clear and erase functionalities.
- How to create a dark mode toggle that switches between dark and light themes.
Video Tutorial:
If you are interested to learn by watching a video tutorial rather reading a blog post you can check out the video down below. Also subscribe to my YouTube channel where I post new tutorials every alternate day.
Project Folder Structure:
Now before we move on to actual coding we create a project folder structure. We name the project folder as – ”Light & Dark Toggle Mode Calculator”. Within this folder we have 3 files. These files are:
- index.html
- style.css
- script.js
HTML:
We begin with the HTML code. Copy the code below and paste it into your HTML document.
<!DOCTYPE html>
<html lang="en">
  <head>
    <meta name="viewport" content="width=device-width, initial-scale=1.0" />
    <title>Dark Light Mode Calculator</title>
    <link rel="stylesheet" href="style.css" />
  </head>
  <body>
    <div class="calculator">
      <input type="checkbox" id="dark-switch" />
      <div class="display">
        <input type="text" placeholder="0" id="input" disabled />
      </div>
      <div class="buttons">
        <input type="button" value="AC" id="clear" />
        <input type="button" value="DEL" id="erase" />
        <input type="button" value="/" class="input-button" />
        <input type="button" value="*" class="input-button" />
        <input type="button" value="7" class="input-button" />
        <input type="button" value="8" class="input-button" />
        <input type="button" value="9" class="input-button" />
        <input type="button" value="-" class="input-button" />
        <input type="button" value="6" class="input-button" />
        <input type="button" value="5" class="input-button" />
        <input type="button" value="4" class="input-button" />
        <input type="button" value="+" class="input-button" />
        <input type="button" value="1" class="input-button" />
        <input type="button" value="2" class="input-button" />
        <input type="button" value="3" class="input-button" />
        <input type="button" value="=" class="input-button" id="equal" />
        <input type="button" value="0" class="input-button" />
        <input type="button" value="." class="input-button" />
      </div>
    </div>
    <script src="script.js"></script>
  </body>
</html>
CSS:
Next, we style our calculator using CSS. For this copy, the code provided to you below and paste it into your stylesheet.
:root {
  --lightBG: #ffffff;
  --lightColor: #000000;
  --darkBG: #000000;
  --darkColor: #ffffff;
  --modeBG: var(--lightBG);
  --modeColor: var(--lightColor);
}
* {
  padding: 0;
  margin: 0;
  box-sizing: border-box;
  font-family: "Roboto Mono", monospace;
}
body {
  height: 100vh;
  background: #f9544c;
}
.calculator {
  width: 400px;
  background-color: var(--modeBG);
  padding: 10px 30px;
  position: absolute;
  transform: translate(-50%, -50%);
  top: 50%;
  left: 50%;
  border-radius: 8px;
}
.display {
  width: 100%;
}
.display input {
  width: 100%;
  padding: 5px 10px;
  text-align: right;
  border: none;
  background-color: transparent;
  color: var(--modeColor);
  font-size: 35px;
}
.display input::placeholder {
  color: #9490ac;
}
.buttons {
  display: grid;
  grid-template-columns: repeat(4, 1fr);
  grid-gap: 20px;
  margin-top: 40px;
}
.buttons input[type="button"] {
  font-size: 20px;
  padding: 17px;
  border: none;
  background-color: transparent;
  color: var(--modeColor);
  cursor: pointer;
  border-radius: 5px;
}
.buttons input[type="button"]:hover {
  box-shadow: 0 8px 25px var(--modeColor);
}
input[type="button"]#equal {
  grid-row: span 2;
  background-color: #f9544c;
}
input[type="button"][value="0"] {
  grid-column: span 2;
}
#dark-switch {
  margin-top: 20px;
  appearance: none;
  position: relative;
  height: 30px;
  width: 50px;
  background-color: #f9544c;
  border-radius: 20px;
}
#dark-switch::before {
  content: "";
  position: absolute;
  background-color: #ffffff;
  height: 20px;
  width: 20px;
  border-radius: 50%;
  top: 5px;
  left: 5px;
}
#dark-switch:checked:before {
  background-color: var(--darkBG);
  left: 25px;
}
JS:
Finally, we add functionality using Javascript. For this once again copy the code below and paste it into your script file.
let equal_pressed = 0;

let button_input = document.querySelectorAll(".input-button");
let input = document.getElementById("input");
let equal = document.getElementById("equal");
let clear = document.getElementById("clear");
let erase = document.getElementById("erase");
let darkSwitch = document.getElementById("dark-switch");

const root = document.querySelector(":root");

window.onload = () => {
  input.value = "";
};

//Access each class using forEach
button_input.forEach((button_class) => {
  button_class.addEventListener("click", () => {
    if (equal_pressed == 1) {
      input.value = "";
      equal_pressed = 0;
    }
    //display value of each button
    input.value += button_class.value;
  });
});

//Solve the users input when clicked on equal button
equal.addEventListener("click", () => {
  equal_pressed = 1;
  let inp_val = input.value;
  try {
    let solution = eval(inp_val);
    if (Number.isInteger(solution)) {
      input.value = solution;
    } else {
      input.value = solution.toFixed(2);
    }
  } catch (err) {
    alert("Invalid Input");
  }
});

//Clear Whole Input
clear.addEventListener("click", () => {
  input.value = "";
});

//Erase single digit
erase.addEventListener("click", () => {
  input.value = input.value.substr(0, input.value.length - 1);
});

darkSwitch.addEventListener("change", () => {
  if (darkSwitch.checked) {
    root.style.setProperty("--modeBG", "var(--darkBG)");
    root.style.setProperty("--modeColor", "var(--darkColor)");
  } else {
    root.style.setProperty("--modeBG", "var(--lightBG)");
    root.style.setProperty("--modeColor", "var(--lightColor)");
  }
  var rs = getComputedStyle(root);
});
Conclusion:
Congratulations! You have built a functional calculator with a dark mode toggle using JavaScript, HTML, and CSS. You’ve learned how to handle user inputs, evaluate expressions, and manage basic theme switching. Feel free to extend this project by adding more advanced features like keyboard input or memory functions.


Error Invalid Input